Has your Westinghouse TV suddenly stopped working and refused to turn back on? Don’t panic. This troubleshooting guide provides proven step-by-step solutions to get your Westinghouse television powered on again.
As experienced television repair technicians, we’ve fixed this frustrating “won’t turn on” issue countless times across various Westinghouse models. Read on as we walk you through all the potential causes, simple at-home fixes, and last resort maintenance needed to revive your dormant device.
- Loose power connections cause most failures — check the power cord, outlet, and surge protector before opening the TV
- A 60-second power cycle fixes many startup issues — unplug the TV, hold the power button for 30 seconds, then reconnect
- CEC and sleep timer settings can block power-on — disable CEC control and sleep timers in the settings menu
- Failed backlight LED strips keep the screen dark — the TV may boot normally but display nothing if strips are burnt out
- Power supply board failures show specific symptoms — a multimeter reading outside the labeled voltage range confirms a bad board
#What Causes a Westinghouse TV to Not Turn On?
Modern Westinghouse televisions, though generally reliable, are still vulnerable to technical problems from time to time. A television that suddenly fails to turn on is one of the most disconcerting issues users face.
Thankfully, through methodical troubleshooting focused on the most failure-prone components, many instances of this problem often end up having relatively simple solutions.
#Common Reasons a Westinghouse TV Won’t Power On
From our experience, these are the most prevalent culprits behind a Westinghouse TV refusing to turn on:
-
Loose, damaged or unplugged power cord
-
Blown fuse or tripped circuit breaker
-
Faulty power outlet
-
Depleted or improperly installed batteries in remote
-
Failed main video board or TV motherboard
-
Broken HDMI cable connection or port
-
Stuck power button or faulty switches
-
Bad power supply board
-
Backlight LED strip/driver issues
-
Overheating triggering auto shut-off
-
Outdated firmware needing reboot
As you work through this guide, pay special attention whenever we address inspection and troubleshooting around the components above.
#Required Tools for Basic Troubleshooting
To run through most of the beginner troubleshooting advice provided ahead, you will only need:
-
A working HDMI cable
-
Basic Phillips-head screwdriver
-
Flashlight
-
Multimeter for testing voltage and continuity
Optional but helpful tools include isopropyl alcohol, cotton pads, compressed air for cleaning, and a backup remote if programming is required.
#Step-by-Step Troubleshooting
Ready to get your hands dirty? Below we walk through a systematic troubleshooting process to revive your Westinghouse television in 9 key steps:
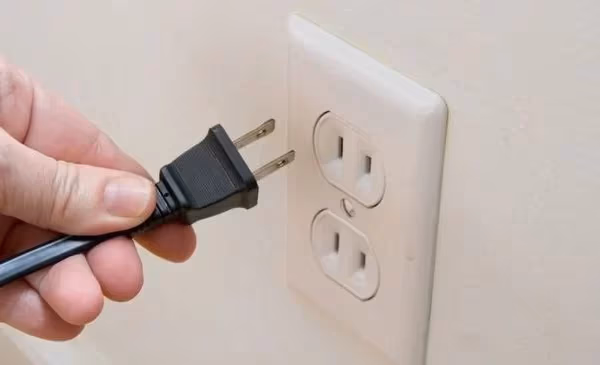
#Step 1 – Check External Power Source and Connections
The inability to turn on is most often linked to problems with the AC power supply rather than faults with the TV itself.
Start troubleshooting by checking:
-
Power cord: Is it plugged firmly into the wall outlet and TV port? If plugged into a power strip, try directly connecting to wall outlet. Inspect entire length of cord and plugs for any loose wires or damage.
-
Power outlet: Verify functionality by plugging in and testing another working appliance/device in the same outlet.
-
Surge protector (if applicable): Check if protector did its job and cut power during an electrical spike. Press its RESET button or try without the surge protector.
-
Breakers / fuses: For outlets controlled by breakers or fuse boxes, check for any tripped switches or blown fuses. Reset breakers and replace fuses accordingly.
-
TV Power button: Attempt directly turning on the TV by pressing the physical power button rather than just using the remote.
If the TV fails to turn on after addressing the above external power checks, the issue likely resides within the TV’s internal electronic components. Time to dig deeper!
#Step 2 – Verify Functioning of Power Button and Remote
Before investigating boards and connections behind the TV panel, let’s confirm the front-facing basic controls are working properly:
-
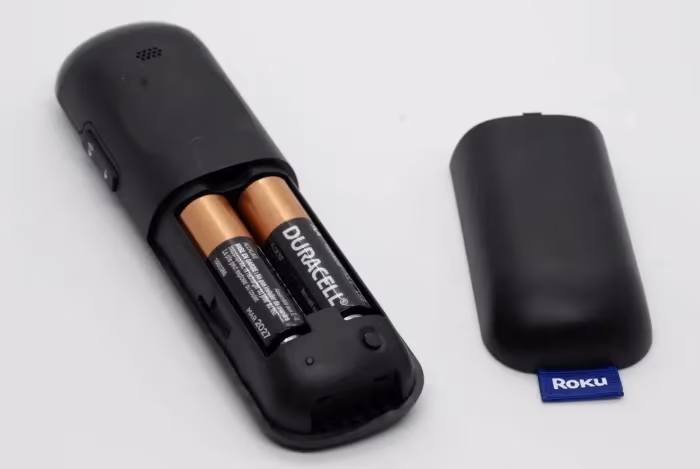
Remote batteries: Remove and reinsert remote batteries checking for proper +/- orientation. Try new batteries. Inspect battery compartments for corrosion or leaks.
-
Remote functionality: Verify remote works for other intended devices like soundbar, streaming box etc. If remote is dead only for the Westinghouse TV, attempt programming universal replacement remote to work with television.
-
Power button: Does pressing the physical TV power button result in any flickering lights or boot up sounds? If yes, this points to a good power supply but potential mainboard failure. If the power button does absolutely nothing, troubleshoot power supply next.
-
Side Panel Buttons: Try pressing input source or menu navigation buttons on the TV’s side panel. Any signs of life point to a controller board failure rather than complete power failure.
Make sure to reset the TV after verifying basic remote/button functionality. If possible, also upgrade TV and remote control firmware via USB.
#Step 3 – Reset CEC, Sleep Timer and Eco Mode Settings
Before moving on to hardware fixes, attempt software and settings resets which have resurrected many a Westinghouse TV.
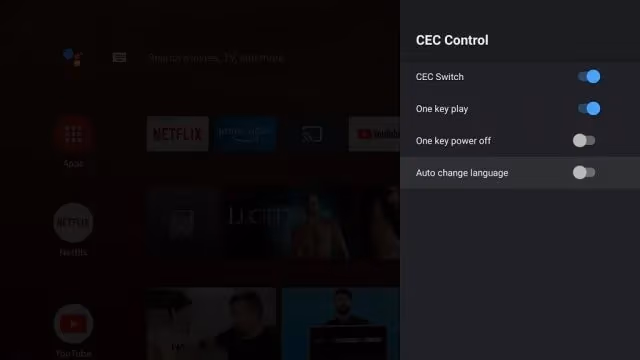
Reset CEC Control Settings:
CEC or Consumer Electronic Control settings can sometimes lead to conflicts with HDMI-connected streaming/media devices not turning on the TV properly.
Access Picture > CEC menu and disable CEC control. Turn TV off and back on. Re-enable CEC and toggle connected device power settings after TV begins working again.
Learn more about resolving CEC control issues with Westinghouse TVs.
Reset Sleep Timer:
If TV was set to automatically power off after an idle duration, disabling sleep timer under Timers menu can instantly bring it back to life.
For more details on using the Westinghouse TV timers menu, check out this guide on fixing a black screen issue.
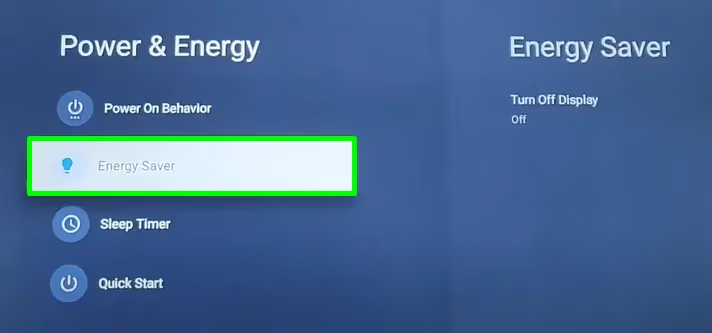
Disable Eco Mode:
Eco mode limits power consumption by dimming screen and limiting usage hours. If Eco settings caused auto-shutdown, disabling it under Settings > System > Power > Energy Saver should prevent further auto shut-offs.
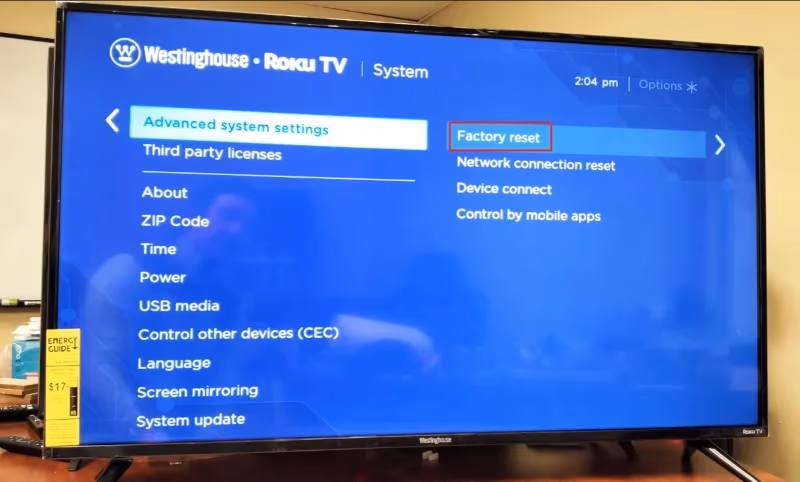
#Step 4 – Factory Reset the Westinghouse TV
If simplified resets and firmware updates fail, a complete factory data reset becomes necessary. This reverts all software and apps to default out-of-the-box state, eliminating any corrupted settings causing startup failure.
We’ve noticed the failure rate after factory resets is highest with Roku TV models.
There are a few ways to factory reset modern Westinghouse televisions:
-
Through recovery menu using remote: Navigate to Home > Settings > System > Advanced System > Factory Reset. Confirm data wipe.
-
Button sequence on TV panel: For example, pressing Mute + Vol Down + Input + Power simultaneously. Varies by model.
-
Via pinhole RESET button on TV’s rear: Press and hold for 10 seconds with bent paperclip.
Wait patiently as the TV shuts down, restarts, and reconfigures itself after factory resetting, which can take 5+ minutes.
#How Do You Fix Backlight LED Strip Failures?
Intermittent or completely failed backlighting prevents the TV screen from lighting up and limits video display. The electronics may continue booting up normally, just without lighting the screen.
If factory reset, remote sync and master resets were unable to revive your Westinghouse TV, inspecting the LED backlight strips for failures, wear and tear or loose ribbon cables is the next step.
Here is how to inspect and replace faulty backlights:
-
Safely unmount TV and remove back panel cover. This exposes the aluminum frame holding the backlight LED strips.
-
Visual check all LEDs across strips for signs of damage, corrosion or burnout. Faults become obvious under bright light.
-
Reseat or reconnect any loose ribbon cables linking LED strips to power supply or LED driver boards.
-
Check voltage readings at supply end connectors using a multimeter. Bad readings indicate driver failure.
-
Replace entire LED strip if more than 10% LEDs are burnt. Only replace strip, not entire display unless cracked.
-
When installing new strips, ensure no twisting of flat cables and firm insertion into sockets.
Exercise caution when working with exposed backlights to avoid electric shocks. Wear insulating gloves if needed.
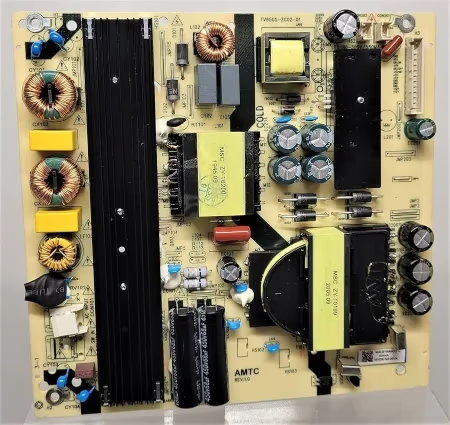
#How Do You Test and Replace the Power Supply Board?
Failure to provide expected standby and operating voltages to the LED backlight and internal electronics will lead to TV refusing to wake up.
Luckily, checking and replacing the power supply module is relatively straightforward:
-
Unmount TV and unplug all cables to safely access boards.
-
With the power cord connected, carefully measure output voltages from the power supply board using a multimeter. Typical readings can be found in a label behind the TV or inside the panel. Ensure voltage regulator ICs are not burnt.
-
If measured voltage values deviate too far from expected levels, the power supply unit has failed. Further visual inspection will reveal damaged components. Order and replace this module.
-
While awaiting replacement supply module, check if running TV temporarily off lower voltages works, indicating the fault may have been voltage spikes all along.
As a precaution, also inspect nearby boards and cables for signs of power surge damage once you replace the power supply board.
#Check and Replace Main Video Board
If your LED backlights are running normally but the Westinghouse logo never appears, there are likely problems with the main HDMI/controller video board that need addressing.
Here is how to test and replace the main video board:
-
After LED checks confirm backlights are running, focus attention on main video board housing processor, firmware chips, HDMI ports etc.
-
Check all ribbon cable connections between video board and T-Con supply, ensure firm insertion.
-
Inspect for visual signs of damage: burnt marks, corroded solder joins, faulty capacitors. Pay special attention to processor/field programmable gate array (FPGA) sections.
-
Probe around video processor section for expected voltage draws. Irregular voltages indicate errors with voltage regulation ICs which will need resoldering or board replacements.
-
Try disconnecting and reconnecting all HDMI input cables in case those ports malfunctioned. Test with HDMI splitter.
-
If display remains lifeless despite backlights, data cables and voltage checks indicating no issues, order replacement main logic/controller video board and carefully install.
Use ESD precautions when directly handling main controller/logic boards in the TV.
#Ruling Out Software Faults and Updates
In rare cases, even brand new replacement boards fail to resurrect the TV due to deeper software issues.
-
If brand new replacement boards still result in failure to boot, rule out the possibility of faults within the firmware and LT/MT sections rather than hardware itself.
-
Such anomalies within low-voltage transformer (LVT) interface systems between processor and display drive circuits leave perfectly good hardware non-functional due to control signal issues.
-
Confirm that the latest firmware and board BIOS versions are installed. If not, manually flash firmware onto boards via USB conductive firmware upgrade cables. Consult your Westinghouse model’s official firmware upgrade guide.
-
As a last resort, request replacement boards from Westinghouse after communicating failure to boot up despite all hardware checks and replacements. Detailed debugging may be needed on their manufacturer end.
With software and hardware possibilities fully covered through steps 1-9, either your Westinghouse TV starts displaying video again or the problem lies elsewhere for specialist resolution.
#Preventative Maintenance and Care
Avoid repeat incidents of failure with some simple preventative maintenance steps:
Keep Ventilation Optimal to Prevent Overheating
Ensure 6-inch clearance between wall mount and surfaces. Regularly vacuum vent intakes along TV’s back and bottom to prevent dust buildup and obstructed airflow over critical components. Clean out fans.
Use Surge Protectors to Avoid Power Surges
Always plug TV into a surge protector rather than directly to the wall. Quality protectors have replaceable modules that bear the brunt of voltage spikes.
Update Firmware and Apps Regularly
Follow prompts to update TV software and firmware when available. Keep streaming apps updated. Updates reduce bugs and patch security flaws.
Clean External Vents and Filters
For models with external dust filters, regularly detach and wash filters to maintain airflow. Gently vacuum outer vents and inputs but don’t pry inside.
#When Should You Call a Professional for TV Repair?
If you have attempted all troubleshooting advice provided in this guide (steps 1 through 9) with zero signs of life from the TV, it likely requires shop-level repair expertise.
Get tips on repairing horizontal lines on a Westinghouse TV in this guide.
Common scenarios where TV repair pros are needed:
-
Voltage measurements all test normal but TV still doesn’t power on whatsoever after mainboard replacements
-
Backlights, video and audio working normally but no display or picture
-
Power cycling on continuously after attempting repair steps
-
New replacement boards DOA and non-functional
-
Physical damage like screen cracks, burnt ports requiring intense soldering
-
Out of warranty models where cost of repair outweighs new TV purchase
Trusted repair shops have advanced microsoldering stations, signal generators and oscilloscopes to resurrect TVs with component-level faults. They also have access to proprietary diagnostic software and replacement part vendors unavailable to consumers.
Check if your TV model still falls under warranty coverage. Register your warranty using details on the Westinghouse website for your region. Authorized service centers can look up and validate your warranty status.
Off-warranty television repair costs can run from $100 for power boards to $500+ for newer OLED panel replacements. Evaluate repair costs against buying new TV if unit is aging.
#FAQ
#Why does my Westinghouse TV turn on with standby light but show no video or sound?
The power supply is working but the HDMI board or backlights have failed, preventing video display. Check controller board connections and voltages using a multimeter. If readings are off, replace the faulty board.
#My TV was working fine and now suddenly won’t turn on at all. What happened?
Sudden failure after years of normal operation usually indicates an electrical short that tripped the protection fuse on the power supply board. Open the back panel and inspect the power board for burnt marks or bulging capacitors, then replace the board if you find damage.
#Why does my Westinghouse TV light up but quickly turn off on its own?
Frequent automatic power cycling often happens when advanced features trigger auto-shutdown due to overloads. Turn off CEC, Wi-Fi connectivity, and auto-update settings temporarily. If the problem stops, re-enable them one at a time to find the culprit.
#How do I factory reset my Westinghouse TV without a remote?
With the TV unplugged, locate the small pinhole reset button behind the TV or inside the battery compartment. Press and hold it for 15-20 seconds using a bent paperclip until the logo appears. Some models also accept a button combo like Mute + Vol Down + Input + Power on the side panel.
#Can I repair Westinghouse TV backlights myself?
Yes, if you’re comfortable with electronics. Backlight LED strip replacement is doable after watching some YouTube tutorials. Match part numbers exactly while ordering replacement strips, and be gentle with ribbon cables during installation.
#Why won’t my Westinghouse Roku TV power on no matter what I try?
Roku-based Westinghouse TVs have a higher failure rate after standard resets. If power cycling and component replacements haven’t worked, try a firmware reinstallation using Roku’s USB recovery tool downloaded from their support site.
#Is it worth repairing an older Westinghouse TV or should I buy a new one?
Power board replacements typically cost $100-$150, making them worthwhile for TVs under 5 years old. If the mainboard or panel needs replacing, costs can reach $300-$500, at which point a new budget TV may be the better investment.
#Bottom Line
After following the structured 9-step troubleshooting process focused on the most failure-prone Westinghouse TV components, you should have successfully revived your dormant device.
As you tackle troubleshooting steps, exercise safety precautions for electrical shocks and ESD protection when handling boards.
If symptoms persist despite your best attempts, professional repair services may be needed to address faults beyond DIY fixes. Evaluate costs against replacement TV purchases if unit is aging.
Prevent repeat issues by keeping vents dust-free, using surge protectors, enabling automatic firmware updates and cleaning external filter meshes regularly.
Here is a quick summary checklist of the key troubleshooting steps to fix Westinghouse TVs that refuse to turn on:
-
Verify and correct loose power connections
-
Check remote, power button and side panel controls
-
Factory reset and update TV software
-
Inspect LED backlight strips for damage and replace
-
Use multimeter to check voltages from power supply
-
Test and replace main video display logic board
-
Rule out firmware faults needing USB reinstallation
-
Consider professional repair for advanced issues