Experiencing flickering, flashing, or blinking on your ONN TV? This troubleshooting guide walks you through all the steps needed to diagnose and repair an ONN TV display. As a technician with over 10 years of experience repairing TVs, I’ve seen every common issue that causes ONN TV picture problems.
In this guide, you’ll learn:
-
The top 10 causes of ONN TV flickering and flashing screens
-
Step-by-step instructions for troubleshooting and fixing the problem
-
Tips for preventing issues and extending your TV lifespan
-
When you may need to replace cables, boards, or the TV itself
Follow the right steps and you can often resolve annoying ONN TV display issues on your own without an expensive service call.
- Power cycling fixes most software glitches — unplug the TV for 2 minutes and hold the power button for 10-15 seconds to drain residual charge
- Loose HDMI cables are the top hardware cause — reseat all connections and replace any cable with bent connectors or frayed wires
- Lowering brightness often stops flickering — switch away from Low Power or Energy Saving picture modes that cause unstable backlight behavior
- Failing LED backlights require strip replacement — individual LEDs burn out after 3-5 years of high-brightness use, creating dark or flickering spots
- Replace rather than repair when costs exceed 50-60% — once multiple boards fail on an ONN TV older than 4 years, upgrading is more cost-effective
#What Causes ONN TVs to Flicker or Flash?
Before we dig into fixes, let’s review the most common reasons you might see flickering or flashing on your ONN TV:
-
Faulty or loose cables: Damaged HDMI or other cables can interrupt signal and cause flickering.
-
Outdated firmware: Software bugs or glitches might be rectified with a system update.
-
Incorrect picture settings: The wrong picture mode or brightness settings could lead to flashing.
-
Failing LED backlights: Individual LEDs burning out along the edges of the screen is common on ONN TVs after years of use.
-
Bad T-Con board: The timing controller board drives the pixels but its signals can fail over time.
-
Loose ribbon cables: The cables linking internal boards can work loose and cause various artifacts.
-
Dying power supply: As power boards age, they struggle to provide stable power to all TV components.
-
Voltage spikes: Electrical spikes from the outlet can disrupt optimal power delivery to the TV.
-
Cold solder joints: Shoddy soldering during manufacturing leads to flaky connections inside the TV.
-
Component failure: Any single component failure along the video processing pipeline can manifest as flickering.
The specific troubleshooting tips below will help you narrow down the root cause.
#General Troubleshooting for ONN TV Display Issues
Before diving into component-level troubleshooting, try these general steps which apply to any ONN TV showing flickering or flashing:
#1. Check External Connections
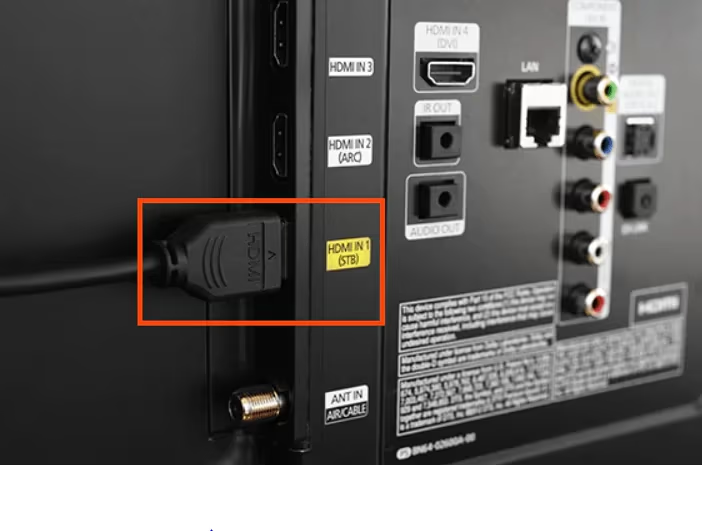
Make sure all the cables running into the TV like HDMI, coaxial, component, etc. are fully plugged in at both ends. Try removing and re-seating each cable connection.
Inspect cables for any obvious damage like frayed wires or bent connectors.
If possible, swap out suspect cables for a known good cable to isolate the problem.
No audio despite ONN Roku TV troubleshooting? Check HDMI connections and cables first.
#2. Power Cycle the ONN TV
Power cycling allows all components to discharge completely and restart from a clean state.
-
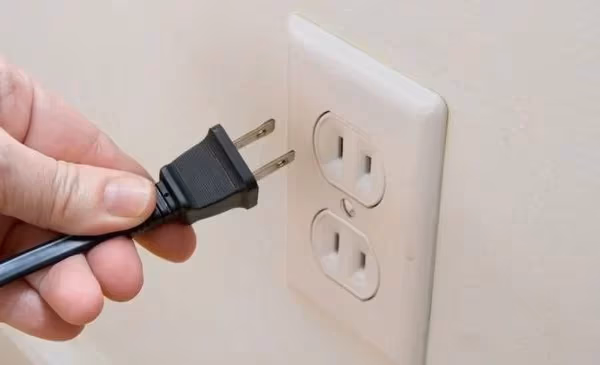
Turn off the TV and unplug it from the power outlet
-
Press and hold the power button on the TV for 10-15 seconds to drain any residual power
-
Leave it unplugged for at least 2 minutes
-
Plug it back in and turn it on to see if the problem persists
This simple step fixes many intermittent hardware issues caused by voltage fluctuations or software glitches.
If your ONN TV shows a black screen even after troubleshooting, there may be a deeper hardware failure.
#3. Reset Your ONN TV to Factory Settings
Resetting can clear out any problematic settings or software corruption causing the symptoms.
To reset, go through the menus:
- Settings -> System -> Advanced System Settings -> Factory Reset
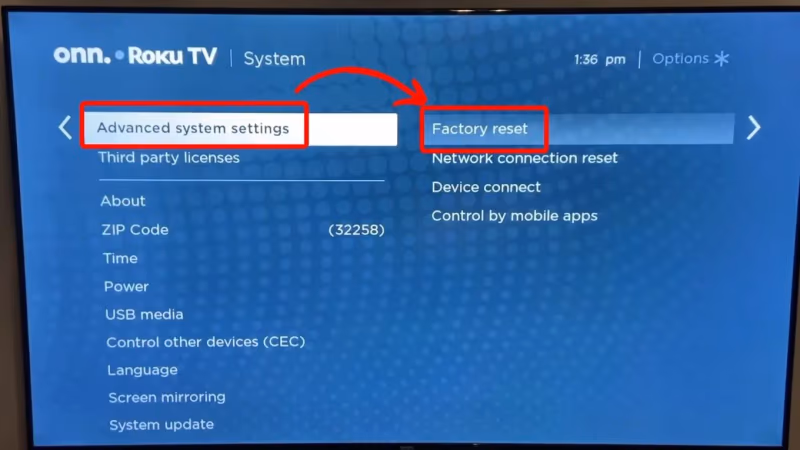
- Choose the full “Factory Reset Everything” option
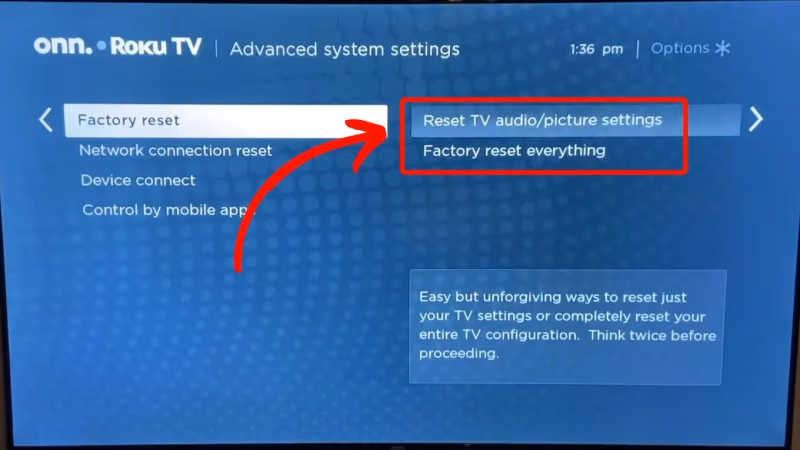
- Enter admin code if prompted

This will erase all custom settings, channels, and apps so backup anything important first.
When resetting your ONN TV to factory settings, be sure to backup anything important first, like custom ONN Roku TV universal remote codes.
#4. Install Updates
Installing the latest firmware and software updates can resolve bugs that might be causing glitching issues.
On ONN Roku TVs:
-
Go to Settings -> System -> System update -> Check now
-
On regular ONN TVs, go to Settings -> Support -> Software update
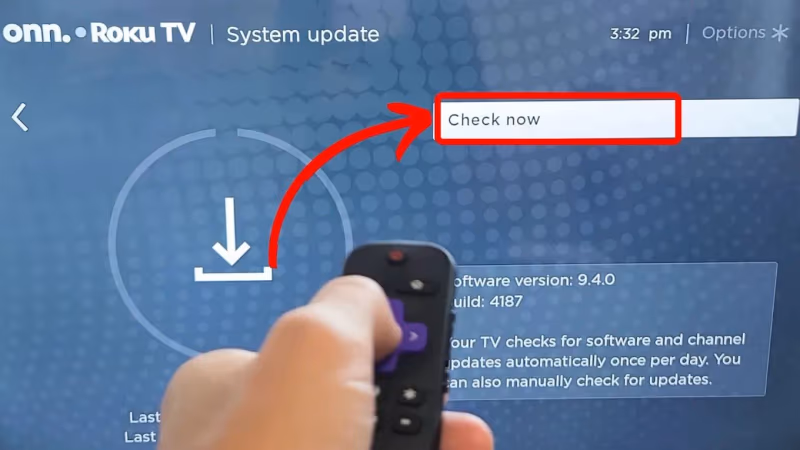
Install any available updates and check if that helps clear up flickering or flashing issues.
#Fixing ONN TV Flashing and Flickering Issues
If you still notice ONN TV display issues after the general troubleshooting steps above, further narrow it down by following these tips targeting common culprits.
#Fix #1: Check Picture Settings
Incorrect picture modes or brightness configurations can sometimes lead to flashing or flickering on the ONN TV display.
Go through the Picture settings and adjust:
-
Picture mode -> Avoid “Low Power” or “Energy Saving” presets
-
Brightness level -> Lowering it often fixes flickering issues
-
Contrast level -> Try lowering slightly
-
Backlight -> Turn down to test if it stops flickering
-
Color temperature -> Switch from warm to normal/cool
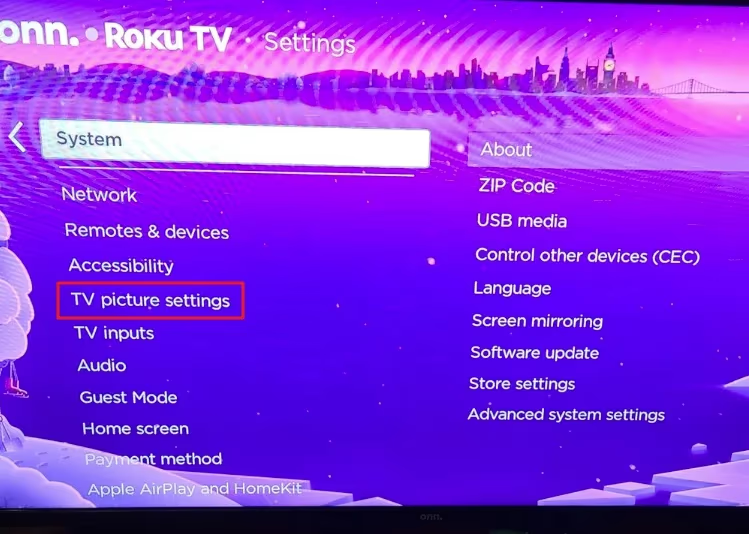
Toggle through each option to isolate any particular settings that seem to be triggering or reducing the flashing and flickering behavior.
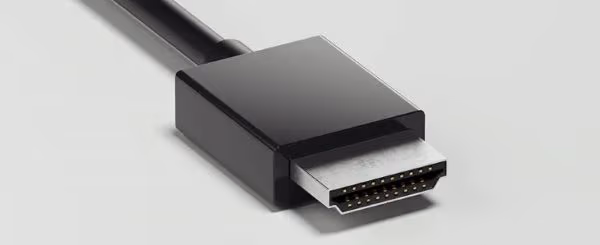
#Fix #2: Replace Faulty Cables
As cables age and endure wear and tear, they eventually can develop breaks or shorts along their length. This leads to signal issues that manifest as artifacts and distortion on screen.
Inspect all the cables plugged into the TV for any obvious damage. Pay particular attention to both ends where maximum bending occurs.
Feel along the length of cables for any kinks, twists, or flat sections that can degrade and expose the internal wires.
The HDMI ports on most ONN TVs are lined up side-by-side which forces very tight bending of cables which fatigues them quicker over time.
If you have any suspect cables, replace them with new ones and test if problems disappear when they are connected. Pay particular attention to HDMI cables as they handle high-bandwidth video signals.
#Fix #3: Re-Seat Ribbon Cables
The various internal boards inside the TV chassis connect via ribbon cables. These thin flat cables can easily work loose over time from repeated heating and cooling cycles.
If the connections become loose, it interrupts signal transfer and corrupts the picture signal causing artifacts.
Here’s how to re-seat any loose ribbon cables:
-
Unplug the TV and open the plastic back panel
-
Identify the ribbon cables linking internal boards
-
Gently remove then reinsert ribbon cables in their connectors
-
Press down firmly on the locking tabs on both sides to ensure a tight fit
-
Close up the chassis and test TV functionality
Pay particular attention to the ribbon cables coming off the T-Con (timing controller) board which drive the actual LCD display panel.
Any interruption along that signal path can directly translate into picture quality issues and screen artifacts.
#Fix #4: Reflow Cold Solder Joints
The solder connections linking circuits inside TVs need to remain solid for dependable current flow. However, constant heating and cooling cycles over months and years of use weakens their integrity.
This manifests as what technicians call “cold solder joints”. Visually, you’ll notice the solder connection looks grainy or dusty instead of a shiny smooth surface.
Electronically, the microscopic gaps formed in cold joints cause resistance fluctuations in those solder points leading to uneven power delivery or signal transmission.
Reflowing the existing solder can fix these cold joints quickly. This restores the broken contacts by melting the solder to fill any gaps that formed:
-
Take the circuit board out of the TV
-
Identify any cold, grainy solder joints
-
Use a soldering iron to briefly heat those points for 1-2 seconds
-
Let the board cool down completely before reinstalling
-
Power on the TV to see if reflowing helped resolve any picture issues
Depending on your comfort with electronics repair, consider getting help for soldering TV boards to avoid any mistakes.
#Fix #5: Replace Failing LED Backlights
The LED backlights in ONN TVs provide the brightness and illumination for the LCD panel to actually show a picture.
These LED strips line the entire edge of the screen. Over years of use at high brightness levels, individual LEDs can burn out sporadically.
This causes uneven backlighting which translates directly into dark or flickering spots on the physical display.
Replacing the entire LED backlight strip is the only viable fix here once LEDs begin failing:
-
Order an LED backlight replacement kit for your specific ONN TV model
-
Very carefully open up the TV starting from the back panel
-
After removing all circuit boards, you’ll gain access to the LED strips
-
Meticulously remove the old LED strips and disconnect wiring
-
Install the new replacement LED strips for your TV
-
Follow proper ESD (Electrostatic Discharge) safety measures throughout
If multiple individual LEDs have failed, it’s possible the voltages driving the backlight are unstable. Consider replacing the backlight driver board or power supply as well.
Professionals strongly recommended for disassembling ONN TVs to access backlights. Risk of permanent damage if mishandled!
Discover fixes for common ONN TV problems like frozen screens and color issues.
#When Should You Replace an ONN TV Instead of Repairing?
While many ONN TV display issues can be resolved with troubleshooting and repairs, there comes a point where investing time into an aging TV yields diminishing returns.
Here are signs it may be time to replace your ONN TV instead:
-
Multiple component failures: Once the power board, T-Con board, and backlights all start acting up, it becomes an unwise game of whack-a-mole.
-
Cost exceeds replacement value: If replacement parts and repairs add up beyond 50-60% the cost of a new equivalent TV, replacement makes more sense financially.
-
Advancing age and wear: As TVs get older than 4-5 years, further deterioration accelerates. The incessant heating and cooling cycles take a toll over time.
-
Lack of modern formats: Very old ONN TVs become incompatible with the latest resolutions, HDR formats, refresh rates and smart software. Time to upgrade!
-
Availability of parts: ONN TV models more than 3-4 years old often have replacement parts or boards that are discontinued and unavailable.
While fixing an older TV seems satisfying, evaluate whether it’s worth your effort compared to buying a new TV with modern technology and features.
Evaluating an ONN TV purchase vs Samsung TVs? Compare QLED versus OLED display technologies.
Compare ONN vs TCL Roku TV models to see display, refresh rates, and smart TV capability differences.
#Tips to Extend Your ONN TV Lifespan
Here are some best practices once your ONN TV is operating normally again:
-
Don’t leave it running all day – turn off at night or when not in use
-
Use eco-friendly power settings to dim brightness and turn off automatically
-
Maintain stable, reliable voltage levels from the power outlet
-
Keep vents and fans clear of dust buildup
-
Use surge protectors to avoid electrical spikes reaching the TV
-
Handle with care and ensure stable placement to prevent falls or impacts
-
Keep away from environmental extremes like intense cold, heat, or humidity
Following reliability best practices enhances longevity for TVs, which is especially important given most ONN TV models only have a 1-year warranty.
ONN Roku TV restart looping? Attempt a factory reset to clear any software corruption.
#Bottom Line
Hopefully after troubleshooting using this guide, your ONN TV backlight flashing and flickering issues are now resolved.
Here are some key takeaways:
-
Power cycling and factory resetting fixes software-related display issues
-
Ribbon cables working loose inside the TV chassis causes lots of artifacts
-
Adjusting brightness levels or replacing a failing HDMI cable may stop flickering
-
Reflowing cold solder joints restores flaky electrical connectivity
-
Failing LED backlights must be replaced once burning out begins
If problems still persist after trying these troubleshooting tips, next steps would be:
-
Recording a video of the exact TV symptoms to aid diagnosis
-
Researching replacement part availability and costs if hardware related
-
Reaching out to ONN support teams for additional troubleshooting help under warranty
-
Considering upgrade or replacement options for very aged ONN TVs
As a TV repair technician, I hope this guide gave you some direction on resolving annoying ONN TV display issues like strange flashing colors or flickering screens. Let me know in the comments if you have any other questions!
#FAQ
#Why does my ONN TV flicker when I first turn it on?
Cold components inside the TV need a few moments to reach stable operating temperature. The T-Con board and LED backlight driver are especially sensitive to temperature swings, and flickering during the first 30-60 seconds usually stops once they warm up. If flickering persists beyond a minute, check your HDMI connections and picture settings.
#Can a bad HDMI cable cause my ONN TV screen to flash?
Yes, damaged or low-quality HDMI cables are one of the most frequent causes of screen flashing. A cable with a bent pin, internal break, or insufficient shielding disrupts the high-bandwidth video signal and produces visible artifacts. Swap in a certified high-speed HDMI cable to rule this out quickly.
#How do I know if my ONN TV backlight is failing?
Place a flashlight against the screen while the TV is on and showing a dark picture. If you can see faint images through the flashlight beam but the screen stays dark otherwise, the backlight has likely failed. Uneven bright or dim patches along the edges also point to individual LEDs burning out on the backlight strip.
#Does a factory reset fix ONN TV flickering?
A factory reset resolves flickering caused by corrupted software or misconfigured picture settings, but it will not fix hardware failures like bad backlights or a failing T-Con board. Before resetting, back up your app logins and custom settings because the process erases everything. Go to Settings, System, Advanced System Settings, then Factory Reset Everything.
#Is it worth repairing an older ONN TV that flickers?
That depends on the repair cost relative to replacement price. If parts and labor exceed 50-60% of what a new equivalent TV costs, replacement makes more financial sense. ONN TVs older than 4-5 years also face discontinued parts and lack support for modern HDR formats and higher refresh rates.
#How do I stop my ONN Roku TV from flickering during streaming?
Start by checking your internet connection speed, since buffering on apps like Netflix or Hulu can mimic screen flickering. Next, go to Settings, System, System update and install any available firmware patches. Lowering the backlight setting and switching the picture mode away from Energy Saving often eliminates flickering tied to adaptive brightness.
#What tools do I need to fix ONN TV backlight flickering myself?
You need a Phillips screwdriver set, a plastic pry tool for the back panel, and a multimeter to test LED strip voltages. For solder reflow work, a temperature-controlled soldering iron rated at 350-400 degrees Celsius is essential. Always wear an anti-static wrist strap to protect sensitive components from electrostatic discharge.